Update Existing Installations
This section will describe step-by-step how to update your existing manually installed LS Central POS devices.
Update Service can't directly upgrade your existing manual installations, you must re-install the application platform (service-tier/NST, web-client, DLL's) with Update Service, but instead of creating a new database, you connect to your existing database. Then you retire the old service-tier and web-client.
Considerations and Requirements
This guide assumes that your existing installations contain the same Business Central apps as in your existing POS bundle. If you have other apps you also like to update with Update Service, it is up to you to add them to your bundle.
Requirements for the existing databases:
- Is running LS Central/Business Central 15.0 or above.
- Database's platform version is the same or earlier version than the POS bundle will install.
- All apps in the existing database are the same or earlier versions than the POS bundle will install.
Make sure to:
- Test the installation in a test environment with a backup of a POS device production database.
- Create a backup of the POS device's database in production before using Update Service to install the new bundle. Update Service will not create a backup of the database on the first installation.
New POS bundle with no Database
- Open NewBundlePackage.ps1 for editing.
- Copy the POS bundle definition (bundle/yourprefix-pos), including the line $PosPackage = New-UssPackage...
- Paste the copied lines below the POS bundle package creation and before the import section.
- Give the new bundle a unique ID, such as bundle/yourprefix-pos-no-db.
- Remove your database package (yourprefix-database) from the dependency list.
- Adjust the variable names, rename
$PosBundleto$PosNoDbBundleand$PosPackageto$PosNoDbPackage - Add the
$PosNoDbPackageto the server import sequence.
...
$PosNoDbBundle = @{
    Id = "bundle/$($Config.PackageIdPrefix)-pos-no-db"
    Version = $Version
    Name = "$($Config.Name) POS"
    Instance = $true
    Dependencies = @(
        @{ Id = "bundle/$($Config.PackageIdPrefix)-pos-master"; Version = "=$Version" }

    )
    OutputDir = $Config.OutputDir
}

$PosNoDbPackage = New-UssPackage @PosNoDbBundle -Force:$Force

if ($Import)
{
    $PosMasterPackage, $PosPackage, $PosNoDbPackage | Import-UssPackage -Server $Server -Port $Port -Force:$Force
}
- If you have made any updates to the other bundles, added/removed or changed a version for any of their dependent packages, you must update the package version numbers as described here.
- Open a PowerShell console.
Save the file and execute the script:
PS C:\LS Retail\My Project> .\NewBundlePackage.ps1 -Import -Force
Run an Installation in a Test Environment
- Create a backup of a POS device's database in production and then restore it in a test environment.
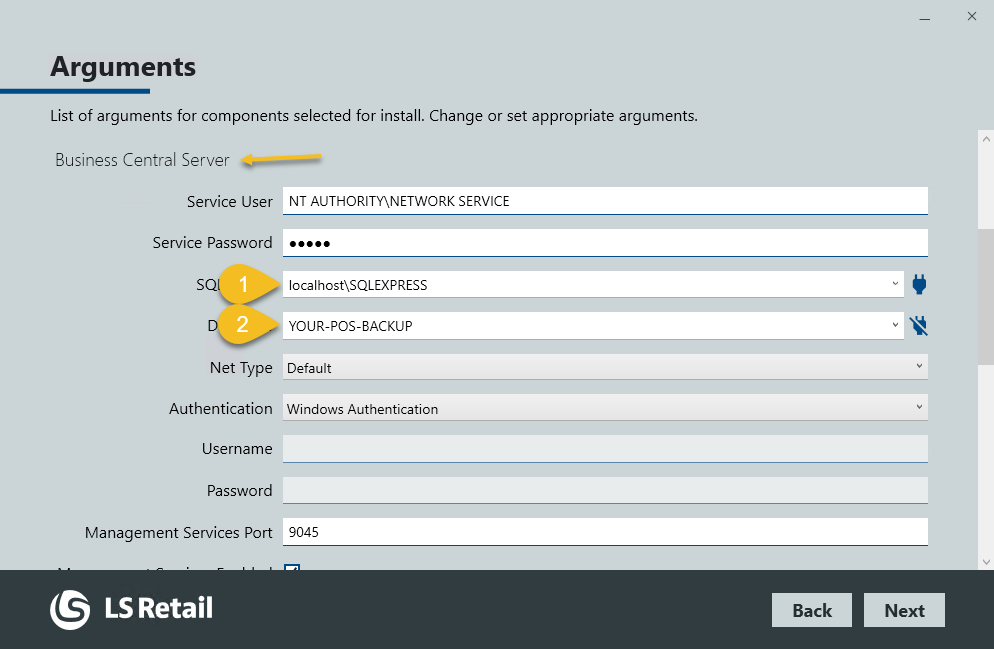
Install the new POS bundle (bundle/yourprefix-pos-no-db) and connect to the backup restored.
Either install using an installer, then select the existing database:

Or using PowerShell, you must change the connection string to connect to the database:
$ErrorActionPreference = 'stop'
Import-Module UpdateService

$InstanceName = 'POS'

$Arguments = @{
  'bc-server' = @{
      ConnectionString = "Data Source=localhost\sqlexpress;Initial Catalog=YOUR-POS-BACKUP;Integrated Security=True"
  }
}

$Packages = @(
  @{ Id = 'bundle/yourprefix-pos-no-db'; VersionQuery = '' }
)

$Packages | Install-UscPackage -InstanceName $InstanceName -Arguments $Arguments
- If the installation was successful, open the web-client and validate that the apps and platform have the correct version.
Install in Production
- Stop the existing service tier and set it to manual.
- Create a backup of the POS device's database.
- Follow step 2. in the section above.