Initial POS Device Setup
This guide describes the initial steps to create a POS setup in Update Service.
Select LS and Business Central Versions
To specify the version of LS Central and Business Central packages, open Project.json in VS Code (or an editor of your choice), and update LsCentralVersion to your preferred version and set BcPlatformVersion, BcAppVersion to null, similar to:
{
    ...
    LsCentralVersion = '17.0.0'
    BcPlatformVersion = null,
    BcAppVersion = null
    ...
}
Hybrid Cloud Components
If you are running a Hybrid Cloud Components setup, the LS Central and Business Central versions should match the versions of your cloud instance. In reality, these versions can differ as the cloud can contain patched versions that are not available on-prem.
Update LsCentralVersion in Project.json to match the version found under Extension Management (type Extension Management in the TellMe (ALT + Q) window.)
- If the version is a patch, the 3rd part is non-zero (i.e. 17.4.4 instead of 17.4.0) you might need to select the minor version instead (17.4.0).
Set BcPlatformVersion and BcAppVersion to
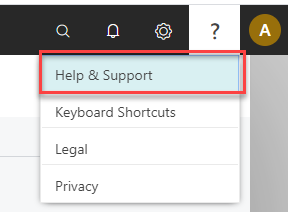
nullas described above.If needed, the platform and application versions are in the LS Central HeadOffice under Help & support (click the “?” in the upper right corner).


Warning
Only list the first three numbers of the BC Version, such as 16.0.14073 and not 16.0.14073.14195
- To determine the matching platform and application versions for a particular LS Central version see here
Download Packages
To download the necessary packages to your server:
- Open a PowerShell console.
To download the necessary packages to your Update Service Server, run:
PS C:\LS Retail\My Project> .\GetLsCentralPackages.ps1
This might take a while, as the packages are being downloaded from LS Retail's server to yours.
When the operation has finished, you can view all the packages in the server: http://localhost:8030
New POS Bundle
In previous step you downloaded packages which include the components to install a POS device.
To select the components, you want to be installed on your POS devices, you need a so-called bundle package. A bundle package is a collection of packages that defines your setup created in NewBundlePackage.ps1.
You need to edit the NewBundlePackage.ps1 file and add some necessary packages, such as a license package and a database package.
...
$Bundle = @{
    Id = "bundle/$($Config.PackageIdPrefix)-pos"
    Version = '1.0.0'
    Name = "$($Config.Name) POS"
    Instance = $true
    Dependencies = @(
        @{ Id = 'sql-server-express'; 'Version' = "^-"; 'Optional' = $True }

        # Uncomment when you have a database package ready and remove ls-central-demo-database.
        # The databaes must be listed before any Business Central dependent packages.
        #@{ Id = 'ls-central-demo-database'; 'Version' = $Config.LsCentralVersion }
        #@{ Id = "$($Config.PackageIdPrefix)-database"; 'Version' = "1.0.0" }

        @{ Id = "bc-system-symbols"; Version = $Config.BcPlatformVersion }
        @{ Id = "bc-system-application-runtime"; Version = $Config.BcAppVersion }
        @{ Id = "bc-base-application-au-runtime"; Version = $Config.BcAppVersion }
        @{ Id = "bc-application-runtime"; Version = $Config.BcAppVersion }
        @{ Id = "bc-web-client"; Version = $Config.BcPlatformVersion }

        @{ Id = 'internal/ls-central-dev-license'; 'Version' = '' }
        @{ Id = 'ls-central-app-runtime'; 'Version' = $Config.LsCentralVersion }
        @{ Id = 'ls-central-toolbox-server'; 'Version' = $Config.LsCentralVersion }
        @{ Id = 'locale/ls-central-au-runtime'; 'Version' = $Config.LsCentralVersion }
        @{ Id = 'ls-dd-server-addin'; 'Version' = "^ >=3.0 <4.0" }

        # Uncomment lines when you have these packages available on your GoC server:
        #@{ Id = "$($Config.PackageIdPrefix)-app"; 'Version' = "1.0.0" }
        #@{ Id = "$($Config.PackageIdPrefix)-license"; 'Version' = "1.0.0" }
        #@{ Id = "$($Config.PackageIdPrefix)-addin"; 'Version' = "1.0.0" }

        #@{ Id = 'ls-hardware-station'; Version = $Config.LsCentralVersion }
    )
...
- Create a new license package for your license and import it to your server.
- Open NewBundlePackage.ps1 for editing.
Find and uncomment your license package line:
#@{ 'Id' = "$($Config.PackageIdPrefix)-license"; 'Version' = "1.0.0" }If you have any other components, such as apps that you want to include on the POS device, you must add them as packages to the dependency list as well. See here for further details.
Now run the script:
PS C:\LS Retail\My Project> .\NewBundlePackage.ps1 -Import- This will create the bundle/yourprefix-pos bundle package and import it to your server.
- If you selected the project type MaintainDatabase or HybridCloudComponents, additional bundle is also created, called bundle/yourprefix-pos-master.
Install the POS Master
This step is only necessary for "MaintainDatabase" or "HybridCloudComponents" projects.
The POS Master instance is where you maintain the data you want to be installed on your POS devices. When it includes the necessary data, a backup of the database is created, then added to a package, and used each time a new POS device is installed.
Install the POS Master by running:
PS C:\LS Retail\My Project> .\UpdatePosMaster.ps1This will install the POS Master with the selected packages in NewPackageBundle.ps1.
When the process is over, a Business Central web client shortcut is created in your start menu.
Warning
It is common for the first-time installation to fail, due to dependencies that require a restart after installation.
- Restart the machine and try again.
- Or see here for further troubleshooting.
Now, add the necessary data to the POS Master, with data director, configuration package, or other means.
Install a POS Device
Create a database package.
Now, you can install a POS device instance:
In the previous section, you created a package called bundle/yourprefix-pos, this package contains or has dependencies to a selection of other packages, which the POS consists of, such as BC web client, BC apps, LS Central app, and your database package (yourprefix-database). So, to install the POS, install this package.
You can either create an installer and select the bundle/yourprefix-pos or use PowerShell:
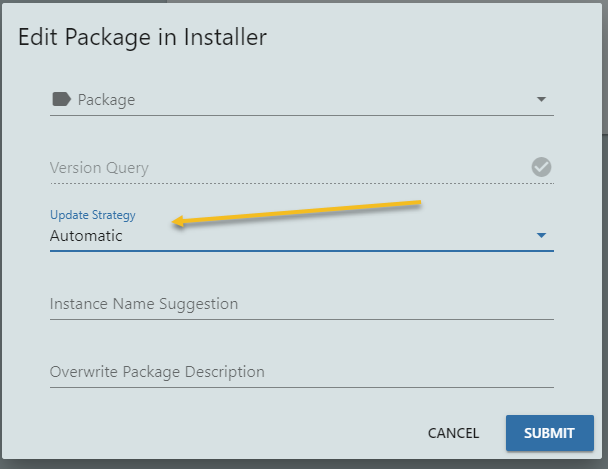
PS C:\> Import-Module UpdateService PS C:\> Install-UscPackage -Id 'bundle/yourprefix-pos' -InstanceName 'POS'Note, to automatically update the POS, you must select update strategy Automatic, when selecting a package for an installer:
 or
orPS C:\> Import-Module UpdateService PS C:\> Install-UscPackage -Id 'bundle/yourprefix-pos' -InstanceName 'POS' -UpdateStrategy 'Automatic'
Warning
It is common for first time installation to result in failure, due to dependencies that require restart after installation.
- Restart the machine and try again.
- Or see here for further troubleshooting.
Setup Staged POS Device Rollouts with Circles
By default, Update Service will rollout any updates as soon as they become available on the server. To roll out more gradually and prevent any accidental updates, it is recommended to use so-called circles for more control.
To enable circles for your POS bundle (bundle/yourprefix-pos):
- Open deployment circles in the management portal.
- Click the + in the right top corner.
- In the dialog, select your POS bundle package (bundle/yourprefix-pos) and click Submit.
- Click Outermost circle, then Set Circle Version button.
- In the dialog, select the latest version, in the drop-down box, then click Submit.
Now you've ensured that any new POS device installations or updates will be on the selected version.
See here for next steps how to roll out an update.